No blueprint ever revealed, nor engineer ever designed, a part with burrs. It is only after a process is selected for making a part that the burring issues become obvious. Veteran designers have learned that even when a deburring process is planned, chances are high that additional burr developments will come to light needing more attention. In most cases, unanticipated deburring is needed in a hurry. A temporary hand-deburring solution is usually the immediate fix until a better solution can be implemented.
Hand Deburring
If you are doing hand deburring as an ongoing solution, then poor quality, inconsistency, a high scrap rate, and employee turnover are likely significant issues for your business. For hand deburring to achieve the desired final results, considerable training must be given; and yet, these jobs are not highly skilled and/or highly-paid positions. And once you get an individual trained who can produce good parts on a regular basis, they develop on-the-job repetitive work injuries, they want to learn another skill and do something else, or they quit. Maintaining a reliable pool of hand deburring workers is tough, and you are always training someone new.
In the best of cases, producing consistent part quality, avoiding part scrapping, and achieving steady production volume are difficult results to maintain with a hand deburring approach. James Richards, founder of James Engineering, explained how manufacturers tend to accept hand deburring as a satisfactory fix despite the drawbacks. “I watched a demonstration of a company’s best hand-deburring specialist as they processed an airplane cylinder head. It was impressive to watch; 17 minutes later, the specialist was done. I said, ‘Great! Three cylinder heads an hour with a three-minute turn around and you can do 21-heads a day; Right?’ ‘Oh no,’ was his reply; ‘We do seven heads a day.’”

People are not machines; it’s very rare to find a person who can maintain production anywhere close to a theoretical or averaged cycle time. On the other hand, the positives of hand deburring are that you can always find a way — with files, sand paper, air-powered hand tools with carbide burrs, stones, coated abrasive flap wheels, and brushes with wire or abrasive-filled, nylon filaments — to get the deburring job done. Frequently it takes all of these tools being applied to a single part to get the job done. Hand deburring works; it’s not cost-effective, consistent, or timely, but it works.
Manual Gear Deburring Machines
Gear deburring machines require an operator to manually set up each deburring tool. Early models used single tools, usually an air tool holding a 3-inch diameter grinding wheel on a weighted, hinged lever. As the gear, which was held to a rotating table, would turn under the tool, gravity would act as the work force that applied the grinding wheel to the outside or inside edges of the gear teeth. If the deburring of simple gears is your need, these early machines were, and still are, quite effective. However, since such machines generally use only one tool to chamfer gear teeth, the exit burrs need to be filed off using a manual lathe or similar method, before this deburring method can be used effectively.
By the 1980s, companies such as James Engineering came along and added up to four tools to these manual-machine designs, which enabled more tools to be used, either all concurrently or in a staggered sequence, for a faster, combined cycle time. Removing exit burrs using this new manual-machine design was no longer a separate operation. This multi-tool advancement changed everything. However, for one company, more was in store before they would be done with their multi-tool manual-machine deburring solution.

In the late ’80s, James Engineering also added its automatic wheel-wear compensation control feature and a unique raised-gear holding capability to further distinguish its early manual-machine models. Together, these additions made the flipping of gears an unnecessary step in the manual-machine finishing process.
Gears could finally be taken right out of a gear cutter and put onto the James Engineering gear deburring manual-machine, either burrs facing up for a one-sided operation, or with the gear raised and held for both sides to be completed in a single cycle. Tool number one is manually set up to remove the exit burrs of the gear. Just a few degrees behind this operation, chamfer tools number two and three can be manually set up to put chamfers on both sides of the gear. Tool number four, an abrasive brush, can then be used to remove the micro-burrs of the chamfered gear teeth, completing four operations and producing a completely finished part in a single cycle.
As the early manual-machine deburring systems gained popularity, people found that each tool took about three to five minutes to set up, test run a part, adjust the setup and retest, and then run a batch of parts. These machines would run cycles of 15 to 30 seconds a side for gears measuring six inches in diameter or smaller. Larger gears might have a cycle time of a minute per side. These types of manual deburring machines are still used today with good success.
The down side to a manual-machine deburring system is that an operator with skill and knowledge of how to perform the manual setup for each gear type is required. Another drawback becomes clear if you are a job shop or production operation with a lot of short-run batches. In these cases, you will spend a significant amount of time each day setting up a manual machine for new parts.
A common scenario is that a business wants to set up six parts each day on a manual machine. Their operator spends 15 minutes setting up the machine, then 10 to 20 minutes getting the setup to produce the quality of part needed by tweaking the setup. On the surface, this timing doesn’t seem bad; but losing three hours just to set up the machine out of an 8-hour shift means you’ve lost 37 percent of each day’s production time.
Today, we are in a digital, computer-controlled world where operators just want to download a program and run parts. It has become very hard to find good manual operators who can turn around a manual machine from part to part in 10 minutes. Where have they gone?
Not all manual gear deburring machines are the same. Many use pivoting axes, which are significantly harder to set up to achieve the desired results. Moving a pivot point for multiple axes means you have shifted all the axes of the tool you are trying to set up along multiple planes at once — a complex visual and spatial problem for an operator to solve quickly. Other machines introduced small openings, which make it difficult to see what is going on during setup. If this old-school approach appeals to you, the best advice is to compare brand features, and do your homework.
Mass Finishing
When deburring and finishing of part surfaces and edges is desired for more of an aesthetic or polished effect — like the old rock tumbler many of us had as kids — mass finishing systems are a reasonable alternative, as long as masking is not required. The mass finishing technique uses a synthetic aggregate mass, often plastic, steel, or ceramic; and applies this mass with either a vibratory motor or a moving container design (barrel tumbling), producing heat and frictional pressure through gravitational or centrifugal force over an extended period of time. As a deburring operation, mass finishing processes multiple parts per batch. Processing time per batch can be 30 minutes to hours long. The use of large mass finishing containers to process a high number of parts at once is a common means of making a longer cycle time more attractive, and for reducing the finishing cost per part.
A frequent complaint heard from users of mass finishing systems stems from the time and resources needed to find, apply, and routinely change out effective abrasives. It is a constant challenge to apply the right size, material, and quantity of abrasive to do a proper deburring job, given different parts’ unique dimensions. The incorrect sizing of abrasive materials can cause media to get stuck in holes, teeth, or crevices of varyingly designed parts. But the most common complaint of abrasive-compound finishing systems is that many parts require masking in order to prevent surface material from being removed from critical areas.
Robotic Deburring
Robots have a lot of really good uses, and we need them; but there are some things they don’t do as well as purpose-built machines. Robots are very good at pick-and-place actions and are especially good at picking and placing items between multiple locations, thanks to computer control. Robots are also great at loading and unloading; however, precision locating of randomly sized and varying loads to different locations at different distances from the robot’s central mounting position often leads to inconsistent or imprecise positioning and placement. Both problems are improved by selecting a bigger robot, but then size and cost become issues.
As manufacturing industries expand the use of industrial robots to include deburring, chamfering, and controlled edge-finishing, some not-so-obvious handicaps affecting these skills have also become evident. To understand why, consider this basic issue: robotic units are roughly designed to replicate the functional nature of a human arm. A robot solution is built to a generalized design standard, including: range of motion, force and angle of tool movements, and maximum weight of a tool or part that can be manipulated with accurate control.
Integrators must work to adapt their product to a particular robot’s standard operating capabilities and limitations, which may or may not meet the cutting and deburring force, angle, and weight support requirements. For each part-processing activity that is within these standardized ranges, the robot’s motion and working skills must be fine-tuned and coordinated, if their programming allows it.
But because robot manufacturers only make the robot; grippers, tool holders, and tooling are designed by third-party companies, and integrators combine these in their offerings. Usually an integrator company is the overall designer and manufacturer of a robotic work cell. Integrators select the robot, tooling, tool holders, and then design and build a cell that manufacturers purchase as a unit; it is then built on the buyer’s production floor. If it doesn’t work or work right, the delays, changes, and risk of not working at all happen on the buyer’s shop floor.
For a wide range of part designs, a standardized robot with an integrator’s tooling may not do the job. For example, reach and access limitations may result from the robot’s anchoring to a floor or base. The nature of robotic solution handicaps stem from this critical robot-tool integration. Several factors limit a robot’s ability to add deburring and finishing tasks to its operations: the available manufacturing workspace, the range of part sizes and weights, the need for wet containment, and the environmental or operator safeguards that must be taken into account. The ability to manage the dynamic, rigidly-controlled motion of a deburring tool using a robot is elusive.
As one engineering author explained: “Conventional industrial robots can be used for milling but are no match for machine tools when it comes to precision.” The inability of robots to apply adequate and steady stiffness behind a tool’s grinding or finishing force leads to increased tool deflection. And as the writer concludes, “Robot milling is unsuitable for applications that demand tight production tolerances.”
CNC Milling Machines
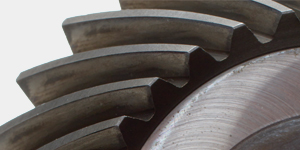
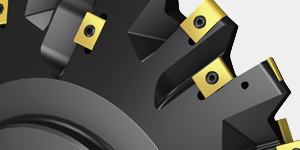
As the CNC machine market matures, providers are looking for ways to add functions to their machines, which are not normally included in their manufacturing operations — functions such as deburring, chamfering, and finishing. A common CNC machining approach has been to offer a cutting tool, usually a coated carbide end mill with a small diameter and a 45-degree angled point, which is programmed to follow the gear tooth contour. A program is written using a CAM system and is then downloaded into the CNC machine. Next, the part is mounted to a timed fixture, and the gear-profile program is then run. All of this is routine stuff. The ever-present problem starts with the cutting tools. (See Figure 1 – Manual-Machine Deburring: Precision vs Inconsistency.)

Aerospace parts cannot have burrs of any kind; the chamfers created need to be smooth with no stress risers and be micro-burr free. New cutting tools start in razor-sharp condition and create a chamfered edge with two sharp corners. These sharp corners need brushing to finish the part to aerospace standards. As the cutting tool continues processing the second, third, and fourth parts, the two sharp chamfered edges are now getting much rougher with each cut. The small portion of the tool’s cutting point, which engages and chamfers the high-quality, steel alloy gear edge, wears down very quickly. The edges continue to degrade at an increasing rate until it is necessary to change out the tool. This degrading process creates chamfered edges that begin sharp and can be brush finished; however, as the chamfered edges of later parts become rougher and rougher, brush finishing can no longer evenly smooth the rough chamfer surface or edges, and may also fail to remove micro burrs created by the degrading tool point and stress risers.
In addition, the whole cutting tool chamfering process is extremely slow, compared to a gear deburring machine doing the same job. The tooling cost is considerably higher than that conducted with a simple grinding wheel used by a gear deburring machine. But the fact that the mill bit tool gets worse and worse with each part is a real show stopper.
On the other hand, a grinding wheel has a unique characteristic: as it wears away, its cutting surface keeps renewing. Every part processed by a properly controlled grinding wheel tool receives the same, consistent, high-quality chamfer finish, just as the first part did. The wheel just gets smaller until it cannot be used anymore. The machine line from James Engineering applies grinding tools using its automatic wheel-wear compensation control feature. On these systems, grinding wheels wear down to their smallest, depleted state without requiring a single setup change. The entire chamfering effort of a single wheel takes place with no discernible change in chamfer angle and size. Factor in the couple of bucks grinding wheels cost for processing hundreds of parts versus the higher cost of cutting tools, which can process at most one or more dozen parts.
What about edge finishing? Brush manufactures are quick to say, “Just put them in; your CNC will work fine.” There are two issues that add significant qualifications to that advice. The first issue: A predictive programming formula created to compensate for brush-wear does not work. Grinding wheels and brushes have an unpredictable wear rate, and since the predictive programming formula CNC machines use to predict wear rates does not accurately measure wear rate, these systems either over-engage or under-engage. This problem really manifests in either too much working pressure, or not enough. Abrasives at times will also get slightly glazed on a brush or wheel as they wear, and will then stop wearing, or they will cut with an “open” rate, wearing very quickly. This glazing doesn’t have a negative finishing effect on the part being chamfered or brushed, but it plays havoc with predicting each brush or wheel’s wear pattern or rate. This unpredictability ensures that a consistent chamfer is impossible to guarantee with computer predictive wear software.
The second issue involves the nanoparticles produced by abrasives as they break down (e.g., aluminum oxide, silicon carbide, CBN, and diamond). These nanoparticles flow with gravity through CNC X- and Y-axes screws and linear slides, finding their way into the ball screws and linear slides or bearings, eating them up with considerable speed. Confirm this for yourself by taking a look at your existing CNC warranties; most do not allow abrasives in their machines or it voids their warranty. The reality is that CNCs offer one advantage: you can download a program into the machine, so your first processed part will be exactly the same every time; but consider both the high cost of perishable tool replacements and a slow possessing rate.
Focused Deburring™, Chamfering, and Finishing
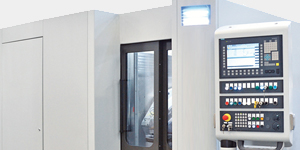
It was the introduction of the MAX System™ by James Engineering that gave birth to the phrase, Focused Deburring™. The MAX System totally makes obsolete the need for skilled operators to manually change setups from one part to another. All the machine operator needs to do is select the correct recipe from the inventory of recipes; press enter; load the part into the machine; then press cycle start. Run one part or 100 parts; select-enter-cycle start and run another one or 100 parts. (See Figure 2 – Focused Deburring of a Life-Critical Aerospace Part.)

To run six different part types during an 8-hour shift, for example, takes less than 30 seconds to set up all six parts. Remember the manual-machine scenario that took 37 percent of a production shift to set up and tune the setups each time? The MAX can run six or 60 different parts in the course of one 8-hour shift and only lose a couple minutes total time to select-enter-cycle start as needed.
Once a part has a recipe, you never need to create another one; and every time you run a recipe, the part that is produced is exactly the same. To create a recipe is no big deal either. A simple spur gear only requires five minutes to create a recipe, and anyone can be trained to do it. No CAM Software or even CAD model is required. Everything is done from the MAX System Machine Interface. This is what deburring, chamfering, and now controlled-edge and surface-finishing have become — simple.
Today’s MAX System is composed of tool towers attached to the machine’s roof. Each model comes standard with one to four towers, and each can use up to six axes of fully synchronized motion. Each tower can have up to three tools. These towers are capable of 1,000-ipm rapid travel, which makes quick work of complex motions. Additionally, the machines can be fitted with a 1,000-rpm rotary table. This nets an impressive system where all axes and rotary tables are fully synchronized, and interpolation, threading, and repeating are all a breeze to manage. This configuration enables the maximum amount of work to be performed at the same time (concurrent processing) by each tower system and delivers a maximum amount of output in very short cycle times.
These upgraded axes give each MAX machine a wide, three-dimensional tooling range and ability to deburr and finish surfaces no other multi-axes machines can match. In this patented design, all electric servos, ball screws, and linear motions are out of the work area, so toxic nanoparticles cannot come into contact with, or affect these components’ day-to-day operations.
The patented tool-head design of the MAX delivers precision, computer-controlled working forces behind its perishable tooling media and produces consistent, ultra-precise edge and surface finishes. Active axes, along with automatic wheel-wear compensation control, allow a wide range of media to be applied with different, precise forces to every part as each tool head moves over different surfaces, performing multiple, distinct deburring and surface finishing processes. In addition, the technology can create different sized chamfers and edge radii to distinct areas of the same part, and apply these combined functions within a single cycle for precise quality and consistency, at extremely high throughput rates.

Along with its Focused Deburring skills, the MAX System delivers selective and focused surface finishing for only the part surfaces manufacturers deliberately choose to finish. (See Figure 3 – Focused Deburring, Chamfering, and Finishing.) It is a simple programming task to avoid surfaces, like bearing diameters and gear teeth contact surfaces, for example. The MAX’s selective finishing abilities — to quickly process some part features and completely avoid others, without requiring part masking or special setup adjustments — is a new and game-changing option for this industry, especially for those who have leaned heavily on abrasive finishing.
Perhaps the biggest misconception of the MAX is price. But let’s go back to the 1960s and 1970s when everyone thought CNC machines would never replace manual mills and lathes for the same reason. How did that turn out? Today, manual shops are all but nonexistent. The MAX, axis for axis, is less expensive than most CNC machines with comparable axes numbers. The MAX, just like CNCs did in the ’60s and ’70s, has begun to take deburring, chamfering, and selective surface finishing by storm, because it does the job faster, better, at lower cost, and without requiring skilled operators.
Combining focused deburring, chamfering, and finishing allows the MAX to work specific part-features, as needed, when needed, and nowhere else. The advantages realized from Focused Deburring, Chamfering, and Finishing are three-fold: 1) reduced cost-per-part, 2) least amount of energy consumed per part, and 3) greatest number of parts produced per perishable tool use. By precisely deburring and finishing only surfaces you want processed, the MAX saves you time, consumables cost, and energy, for MAX(imum) Efficiency.


