Over the years, gear manufacturers have increased their knowledge of the production of quality gears and gear-like components. This knowledge has led to many improvements including lower noise, lighter weight, and lower cost as well as increased load-carrying capacity to handle higher speeds and torque with a minimum amount of generated heat.
Improvement in wear resistance, contact fatigue strength, endurance and impact strength helps to eliminate premature gearbox failure. Formation of considerable compressive residual stresses at the surface and in the subsurface help inhibit crack development and resist tensile bending fatigue. Gear performance characteristics dictate the required surface and core hardness, hardness profile, residual stress distribution, grade of steel, and its prior microstructure.
In contrast to carburizing and nitriding, induction hardening does not require heating the whole gear or pinion. Instead, the heating can be primarily localized to the areas where metallurgical changes are desired [1]. Piece-by-piece processing capability with individual component traceability and environmental friendliness are two other features that make an induction technology very attractive. Not all gears and pinions are well suited for induction hardening. External spur and helical gears, worm gears, internal gears, racks, and sprockets are among those that are typically induction hardened (Figure 1).

Depending on the size of the gear, the required hardness pattern, and tooth geometry, gears are induction hardened by encircling the whole gear (external or internal) with an induction coil (the so-called “spin hardening”) or, for larger gears, hardening them tooth-by-tooth with either gap-by-gap or tip-by-tip heat-treating techniques.
Gear Heat-Treat Resources

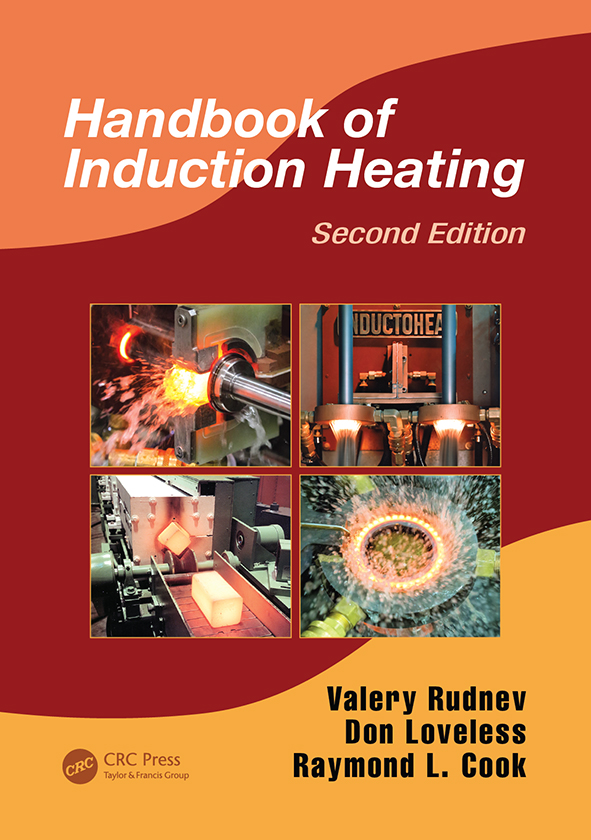
Gear heat-treating by means of electromagnetic induction is a topic of major significance, and the technology continues to grow. The second edition of the Handbook of Induction Heating (Figure 2) was recently published, reflecting innovations that have taken place over the last decade in the practice and science of modern induction heat-treating, computer modeling, power supplies, failure analysis, quality assurance, etc. [1]. This includes:
- Subtleties of tooth-by-tooth induction hardening of large gears. A comparison of inductor designs. Ways to avoid back tempering. Control of electromagnetic end and edge effects.
Gear spin hardening using encircling coils. Effect of frequency and power on hardness pattern. Single frequency vs. simultaneous dual frequency vs. IFP-Technology. Achieving true contour hardening of gears and gear-like components. - Metallurgical insights of induction hardening steels, cast irons, and powder metallurgy components. Effect of rapid heating on the kinetics of austenite formation. Impact of steel cleanliness, prior microstructure, heterogeneity and presence of residuals and inclusions.
Subtleties of quenching techniques applied in induction hardening. Shape/size distortion control and prevention of cracking. Transient and residual stresses. - Specifics of hardening parts for automotive, aerospace, off-road and other industries. Innovations and inventions in equipment designs maximizing process robustness and machine flexibility.
- Simple solutions for typical induction heating challenges. Best practices for equipment maintenance and safety principles, “Do’s and Dont’s” items, and many others.
This installment is the first of a two-part article focusing on material selection, metallurgical subtleties of rapid heating and specifics of tooth-by-tooth induction hardening of medium-size and large gears. Part II will be devoted to induction spin hardening of small and medium-size gears.
Material Selection
Several guidelines, recommendations, and standards help to select an appropriate material for gears, including AGMA, ANSI, and ASTM standards. Since induction hardening does not change the chemical composition of steel, the steel grade must have sufficient carbon and alloy content and be capable of achieving a certain surface hardness, case depth, and core strength. Low-alloy and medium-carbon steels with 0.4 to 0.55% C (e.g., SAE 1040, 15B41, 4140, 4340, 4150, 1552) are commonly used in induction gear hardening. In some applications, high-carbon steels (SAE 5160, 1080, 52100) are used, as well as martensitic stainless steels, cast irons, powder metallurgy materials, and proprietary microalloy steels.
It is important to have a sufficiently “friendly” prior microstructure (structure of parent material) when induction hardening gears. It is highly desirable to use sufficiently homogeneous (both: chemically and structurally) prior structures without excessive segregation and severe banding. Q&T microstructure with a hardness range of 30 to 36 HRC leads to fast and consistent steel response to induction hardening. In contrast, steels with large carbides (i.e., spheroidized steels) have poor response to induction hardening requiring prolonged heating and higher temperatures for austenitization. A combination of high temperatures with longer heat time may lead to grain growth, data scatter, and excessive gear distortion. Coarse martensite has a negative effect on tooth toughness and impact strength. These are the reasons why steels in normalize and Q&T conditions are often used in induction gear hardening.
Metallurgical Subtleties of Rapid Heating of Steels
Rapid heating considerably affects the kinetics of austenite formation, shifting it toward higher temperatures according to the continuous heating transformation (CHT) diagrams. Practically all of the carbon, which is present in the initial ferritic-pearlitic structure, for example, is contained in the pearlite. Therefore, regardless of relatively high solubility of carbon in austenite, some minimum time is required during solid-state transformation (such as austenization) for carbon to be diffused from pearlitic regions into areas occupied by ferrite. Therefore, it is required to create conditions conducive to the needed diffusion-driven processes in order to develop an essentially homogeneous austenitic structure with sufficiently uniform carbon distribution before quenching that is desirable for the great majority of induction hardening applications.
Rapid heating causes a measurable increase of critical temperatures (e.g., Ac1, and Ac3) compared to the corresponding temperatures A1 and A3 indicated by the equilibrium phase transformation diagram. The nucleation and growth of austenite in the rapid heating of measurably heterogeneous initial structures are more concerning than in case of thermo-chemical diffusion processes (e.g., carburizing), which applies significantly longer process times. Selection of hardening temperatures based on the equilibrium Fe–Fe3C diagram and failure to choose the proper hardening temperatures taking into consideration the appreciably non-equilibrium nature of induction heating may result in incomplete transformation and mixed as-quenched structures. Metallographic evaluation helps reveal the presence of “ghost pearlite” and other upper transformation products in the as-quenched specimens that are associated with not fully transformed structures or with the presence of severely heterogeneous austenite before quenching. The degree of heterogeneity in the microstructure of the as-quenched component can be reduced by increasing the hardening temperatures and by lengthening the time at the austenite phase temperature range.
A number of studies have been conducted to quantify the effect of heat intensities typical for induction hardening and prior microstructures on the shift of critical temperatures and the ability to form satisfactorily homogeneous austenite. Reference 1 summarizes the results of those studies.
Q&T prior structures result in a consistent response to rapid induction hardening with minimum amounts of grain growth, shape/size distortion, and required heating energy. These prior structures are associated with a well-defined (crisp) pattern with a short transition zone and may also produce slightly higher than expected hardness levels (when hardening medium-carbon steels) and deeper case depths, and form greater compressive residual surface stresses compared with other types of initial structures.
Normalized structures consisting of a uniformly distributed fine-grain mixture of ferrite and pearlite also provide a rapid response to induction hardening, allowing one to reduce the required hardening temperatures and times almost as much as Q&T prior structures and resulting in fast and consistent transformations.
Tooth-by-Tooth Hardening of Gears
As the name implies, each tooth is heated individually. The tooth-by-tooth method comprises two noticeably different techniques: tip-by-tip or gap-by-gap hardening. Presently, tip-by-tip hardening is rarely used because the hardening patterns usually do not provide the needed fatigue and impact strength in the root area. This is the reason why the term tooth-by-tooth hardening is almost exclusively associated with the gap-by-gap hardening method and terms tooth-by-tooth and gap-by-gap hardening are often used interchangeably.

There is a limitation to applying this method for hardening external and internal gears. Pitch diameters of external gears and pinions are typically greater than 200mm (8in.) having coarse teeth (modules greater than eight). It is commonly required that the pitch diameter of an internal gear exceed 250mm (10 in.).
Gap-by-gap hardening is a time-consuming process. Scanning rates can reach 10 mm/s and even higher (though 6 to 8mm/sec is more typical). Power requirements for these techniques are usually quite low. This can be considered an appreciable advantage, because if gear spin hardening is used using encircling coils, a large gear would require an enormous amount of power which could diminish the cost effectiveness of the heat-treating or make it not even feasible.
Inductor Designs
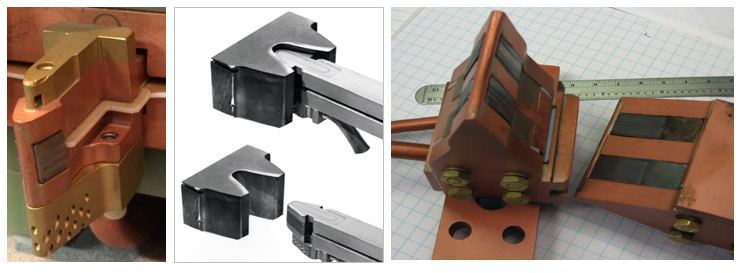
As one can see from Figure 3, middle and right images, the path of the induced eddy current has a butterfly-shaped loop. The maximum current density is located in the root area (the body of the butterfly). This is the reason why this inductor style is also called a butterfly inductor. Massive area below the tooth root “acts” as a potent cold sink requiring additional heat generation there. In order to further increase the power density induced in the root, a stack of laminations is typically used as flux concentrators.


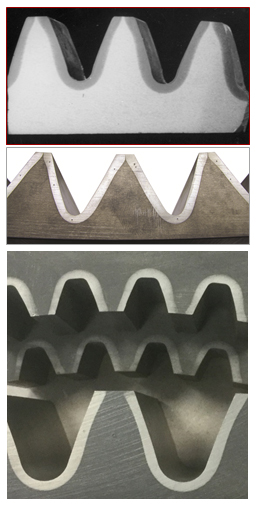
Although the eddy current path has a single- or double-butterfly shape, when applied with a scanning mode, the temperature and hardness pattern is distributed within the tooth root and flank quite uniformly. As an example, Figure 5 shows a variety of tooth-by-tooth hardness patterns. These patterns provide an exceptional combination of fatigue and wear strength as well as resistance to shock loading and scuffing, which is very important for heavily loaded gears and pinions experiencing loads of appreciable magnitude. It is commonly recommended that for these applications, surface hardness should not be too high, typically in the range of 55 to 59 HRC. If surface hardness exceeds 61 to 62 HRC, the gear might be too brittle.
Due to relatively small inductor-to-tooth air gaps (0.8mm to 2mm being typical) and harsh working conditions, these inductors require intensive maintenance and precise set-up compared to hardening inductors that encircle the gear. Pattern uniformity is quite sensitive to inductor positioning. Asymmetrical positioning results in a non-uniform hardness pattern. For example, an increase in the air gap between the inductor copper and the flank surface on one side will result in a reduction of hardness and shallower case depth there, altering the mechanical properties. Therefore, precise inductor fabrication techniques, its rigidity, and superior alignment techniques are essential. Special locators or electronic tracking systems are often used to ensure proper inductor positioning in the tooth space. Thermal expansion of metal during heating should also be taken into consideration when determining the proper inductor-to-tooth gap. After loading and initial coil positioning, the process runs automatically based on the developed process protocol.
Selection of Process Protocols
Particular attention should be paid to electromagnetic end/edge effects and the ability to provide the required hardness pattern in the gear end areas, as well as along the tooth perimeter. To obtain the required temperature uniformity, it is necessary to use a complex control algorithm: Power vs. Scan Rate vs. Inductor Position. A short dwell at the initial and final stages of inductor travel is often used. Thanks to heat transfer due to thermal conduction, the dwell at the end of inductor travel is usually shorter compared to the dwell at the beginning of travel or is not applied at all.
Since the eddy current makes a return path through the upper region of the flank and, particularly through the tooth tip, proper care should be taken to prevent overheating the tooth tip. Overheating of the tip can substantially weaken the tooth.
With the scanning mode, two techniques can be used: a design concept where the inductor is stationary and the gear is moveable, and a concept that assumes the gear is stationary and the inductor is moveable.
There can be appreciable shape/size distortion when applying tooth-by-tooth hardening. Shape distortion is particularly noticeable in the last heating position where the last tooth can be pushed out 0.1 to 0.8mm. There is a direct relationship between the volume of required metal removal and the grinding time. Thus, excessive distortion leads to a prolonged grinding operation and increases the cost. Repeatable distortion may be compensated for during gear fabrication. Hardening every second tooth can minimize distortion. Obviously this will require two revolutions to harden the entire gear. Final grinding may be still required.
Even though there might be appreciable distortion when hardening large gears and pinions (e.g., mill, marine and large transportation gears, etc.) its magnitude is not typically as significant when compared to carburized gears. Carburizing requires soaking of gears for many hours (in some cases up to 30 hours or longer) at temperatures of 850°C (1,562°F) to 950°C (1,742°F). At these temperatures the large masses of metal expand to a much greater extent compared to the case when only the surface layer is austenized. The expansion of a large mass during prolonged heating during carburization and the contraction during cooling/quenching cycle “moves” the metal to a much greater degree resulting in larger gear distortion.
Besides that, large gears being held at carburizing temperatures for many hours have little rigidity; therefore they can sag and have a tendency to follow the movement of their supporting structures/fixtures during soaking and handling. With induction hardening, areas unaffected by heat as well as areas with temperatures corresponding to the elastic deformation range serve as shape stabilizers and lead to not only lower, but more predictable distortion, which is easier to compensate.
Control of Undesirable Temper Back
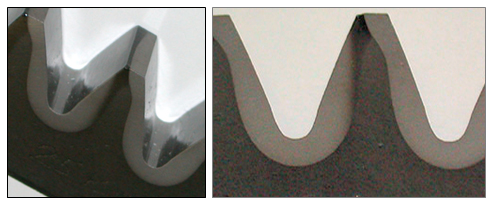
One typical concern when applying tooth-by-tooth hardening is the challenge related to undesirable heating and softening of the areas adjacent to the hardened area (tempering back). The main cause of undesirable softening/temper back is associated with the thermal conductivity phenomenon. Heat is transferred by thermal conduction from a high-temperature region of the gear tooth toward a lower-temperature region and is a function of the temperature difference, distance and the value of thermal conductivity. Most metals are relatively good thermal conductors. During austenization, the surface temperature exceeds the critical temperature Ac3. Therefore, when heating one side of the tooth there is a danger that the opposite side of the tooth will be heated by thermal conduction to an inappropriately high temperature. This may result in undesirable softening of previously hardened areas (Figure 6).

Conversely, the addendum and, in particular, tooth tip region can be considered as an area of concern because there is a relatively small mass of metal. In addition, heat has a short distance to travel from one (heating) side to the other (already hardened) side of the tooth (Figure 6).
To overcome the problem of tempering back, special cooling spray blocks are applied. Additional cooling protects already hardened areas while austenizing unhardened side of the tooth. Even though external cooling is applied, there still may be some unavoidable tip softening depending on the tooth shape and process parameters. This tempering back is typically insignificant, well controlled, and acceptable (Figure 5).
Tooth-by-tooth Gear Hardening Equipment
Applied frequencies are usually in the range of 3kHz to 30kHz and inductor powers of 50kW to 150kW range. At the same time, there are cases when a frequency of 70 kHz and even higher frequencies have been used. Figure 7 shows an example of Inductoheat’s standard induction machine for tooth-by-tooth hardening large gears.

Tooth-by-tooth hardening can be applied for gears submerged in a temperature-controlled quench tank. This technique was applied in the original Delapena (UK) induction hardening process. In this case, quenching is practically instantaneous. However, noticeably higher power is needed to compensate for the cooling effect of the quenchant during heating. The fact that a gear is submerged in quenchant also helps to prevent the tempering back problem. In addition, the quenchant serves as a coolant to the inductor. Therefore, in submerged hardening an inductor might not have to be water-cooled. On the other hand, there might challenges to set up this system because of quenchant obstruction issues.
In induction surface hardening, applied frequency has the greatest effect on depth of heat generation and an appearance of electromagnetic end and edge effects. It is advantageous to apply various combinations of frequency, power density, and scan rates at various stages of the gear scan hardening cycle. This would allow improving the metallurgical quality of teeth effectively addressing the presence of end zones (sides of gear) as well as specifics of gear tooth nomenclature. Unfortunately, the majority of presently used inverters do not have such capability.
A new generation IGBT-type inverter (Statipower-IFP) recently developed by Inductoheat Inc. eliminates this limitation and simplifies achieving the required hardness pattern [2]. The patented technology is specifically developed for induction scan hardening needs. It enables instant and independent adjustment of frequency (from 5kHz to 60kHz) and power (up to 450 kW) in a pre-programmed manner during the heating cycle, optimizing electromagnetic, thermal, and metallurgical conditions. The capability of IFP inverters to instantly change power and frequency during scan hardening is essential for better control of end/edge effects, help to avoid edge overheating and cracking, and it is particularly beneficial when hardening a variety of gears with appreciably different tooth geometry and case depth requirements.
This innovative technology effectively addresses industry needs for cost-effectiveness and enhanced process flexibility, greatly expanding induction equipment capabilities and further improving metallurgical quality of induction hardening.
References
- V. Rudnev, D. Loveless, R. Cook, Handbook of Induction Heating, Second Edition, CRC Press, 2017.
- G. Doyon, V. Rudnev, C. Russell, J. Maher, Revolution – not evolution – necessary to advance induction heat treating, Advance Materials & Processes, September, 2017, p.72-80.About the author Dr. Valery Rudnev, FASM, is director of science and technology at Inductoheat, Inc., an Inductotherm Group company. More information is available at www.inductoheat.com. Some of the information presented here was first published in the Handbook of Induction Heating, Second Edition, by V. Rudnev, D. Loveless and R. Cook, CRC Press, 2017. CRC Press has granted a permission publishing these materials.
About the author
Dr. Valery Rudnev, FASM, is director of science and technology at Inductoheat, Inc., an Inductotherm Group company. More information is available at www.inductoheat.com. Some of the information presented here was first published in the Handbook of Induction Heating, Second Edition, by V. Rudnev, D. Loveless and R. Cook, CRC Press, 2017. CRC Press has granted a permission publishing these materials.


