The broaching of precision gears will always start with a designed broach to match the specification of the part print. The broach designer will evaluate all the facts such as material, wall thickness, and, most importantly, the class of fit required on the gear. However, even with all the expert knowledge the designer puts into the broach tool to satisfy the specifications, there is no control over how the tool is used.
The broach will most likely be used on a horizontal broach machine. The horizontal broach machine has the largest percentage of older existing machines out in the workforce. The reason so many companies have the horizontal broach machine is that these machines are so versatile for general broaching, such as cutting keyways in hobs or gear-related parts.
For broaching precision gears, a very accurate line up is required. For example, imagine how much a 78-inch broach that weighs 400 pounds will sag if it’s pulled horizontally just fighting gravity! Only 3½ inches of the 78-inch broach is in the puller. A standard puller tolerance is in the 0.008”– 0.010” over nominal range. The oversize hole helps in the ease of loading the broach, but the oversize condition really lets the tool sag. The same goes for the finish end of the broach tool, because it may only be supported by two to three inches. When the tool starts to build force, the jaws of the puller will want to centralize the pull end and try to shift the part, even if the cut has started to favor one side. If the tail end is also supported, the part itself will rest on one side of the broach pilot because of the hole having to be even 0.001” – 0.002” over to get it on the tool. All of that misalignment really adds up and eats into the tighter tolerances the manufacturer is trying to hold. We have been talking about a large tool, but keep in mind there may be even more whipping and/or sag in a long, thin tool.
The best way to fight gravity is to use it to our advantage. When we pull the broach vertically, there will be no favoritism to affect concentricity of the gear blank. You can then use a precision puller with a tighter tolerance to nominal size because the loading is in a straight line.
The machine structure has to be supportive against the pulling forces. The machine also needs a broach guidance system with repeatable alignment of the tail end during the broaching operation. This can be accomplished by pulling the tool down through the part; this means the puller and the movable retriever must be in alignment and move as a single unit. Now, you are pulling a broach down through the part, so this means the operator is well above the floor. With our 78” 400lb broach, this means the operator will be at least six feet off the ground. We have improved quality, but added handling time and overhead cost. The parts are moved to the machine, then again to lift the parts up six feet, in and out of the machine, then back down six feet (See Figure 2).

To keep the operator on the floor and close to the parts there is a less-than-desirable, expensive solution: Cut into the shop floor to dig a pit in order to drop the machine into it. You will also have to protect people from falling into the pit with some type of guarding. Access will have to be easy enough to perform maintenance on the machine. Removal of chips and even maintaining the coolant could be quite difficult.
The best solution is this: Keep the operator on the shop floor and pull the part up over the broach. There are no pits to worry about, it’s safe for the operators, and it’s easy on the maintenance staff. This makes it easier to move the machine around as the work cell changes on the factory floor (with no pit to fill in).
When you think of precision in a die set you will always use a four-poster; this keeps all the force of the cutting action within the guidance of the four posts. There will be no tipping during the range of the cutting force, as it builds and drops off while entering the finish section. The tipping action can be imagined on a cantilevered fixture. Imagine a diving board with all its support on one side. The forces build up on one side, stretching the bolts on the other and deforming the overall support. Then they spring back as the broach enters the finish section, with less force pushing it down. That spring-back will shave the form as it tips backward, in order to get in relaxed alignment again. You may think that is only maybe a few tenths in the broaching operation, but could be a large percentage of the tolerance in the gear’s tooth form.
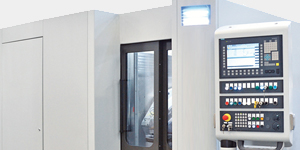
A broach machine built like a precision die set is an important element during production of a precision gear. The piece (gear blank) is located in the middle of four guide posts, one post in each of the four corners. On the top plate of the four post machine is mounted a precision-guided retriever tower. The retriever is doweled into the top plate in perfect alignment with the four guide post and the puller (Figure 1). The guided retriever lifts and lowers the broach through the part and into a stationary puller. The retriever also holds the tail section of the broach in position all the way through to the finish teeth of the broach. The work holding platform is pulled up by two hydraulic cylinders guided up by the same four guide post.

The advantage of a precision four-poster broach machine is that the pulling force is in the direct line of the broaching action by two cylinders, one on each side. Since the force is in the middle of the two cylinders there is no cantilever movement. With the two cylinders pulling in unison, it is a balanced and straight pull, not offset. Remember: With the “springing diving board” effect, any tipping of the part cuts into the tolerance.

The addition of a shuttle table, which moves toward the operator, means there is no reaching over to load the gear blank (Figure 3). The blank is put into a workholding nest, which locates the datum points with just enough clearance to ease the loading. At that point the operator can start the process. The automatic doors close and activate the safety interlock; they also stop coolant from splashing onto the floor during the cutting action. The table then shuttles it into work position with perfect alignment of the puller, broach, and retriever. The table is held in position by two cylinders up against a positive stop. Now the retriever can lower the tool through the gear blank and into the precision puller. Since the puller is stationary to keep in perfect alignment, it will have to be closed by air. The spring mechanical-type pullers used on a horizontal broach have to travel about a half inch to lock on the pull end (Figure 4).

When the shuttle table is in position, the broach is loaded through the gear blank and the puller is locked. To get to this point, the PLC has performed a safety check at every step. The first is to close the doors before any movement of the shuttle table. The next check is performed after the table is locked in position, before lowering the broach through the part: While the retriever is lowering the tool through the part, it checks that it fits onto the front pilot. If not, it will trip under size safety switch. The last check is to make sure that the air puller is locked on the pull end. Now the part can be broached, since all the sensors are giving the green light to the PLC to work.
The table and the part are raised up over the broach and sent through the last of the finish teeth. The broach safety sensor is monitoring all along, so that if a tool breaks, it will be prevented from crushing the retriever. When the cutting action is completed, the retriever will retract up and out of the way of the finished part. Now that everything has cleared the end of the tool, the table can move with the gear forward to the front of the machine. A hole has been created so that the table can be lowered back down to the load position without any interference to the tool. The final action is for the automatic doors to open after the table is back down.

The open concept of the machine lends itself nicely to automation as it allows the gears to be loaded in the front of machine which will eliminate reaching way into the machine (Figure 5). It can be fed with a simple pick and place with two grippers. One gripper will pick up the finished part as the second gripper picks a new part to be placed into the work holding nest. The advantage of the four post design is to have the ability to load in the front and then unload in the back of the machine. The machine can even have several stations to handle large volumes or different parts in each position, which can be advantageous to your production requirement or product mix.


